Update a single Citrix XenServer in a Pool
The Citrix XenCenter offers an easy way to update your XenServer (Pools). Furthermore, most updates can nowadays be installed without a reboot. Only a few require a reboot or a XE-Toolstack restart. This process is fully automated. This means that the first host is updated and (if necessary) rebooted. Then the second one follows and so on. To reboot a host the VMs are migrated to another host. This is fine until you use local storage for your VMs. (I don’t want to discuss here if this makes sense or not!) When the VMs are using local storage, they cannot be automatically migrated. When they are deployed using MCS they even can not be migrated manually (the base disk would be still on the initial host). In the past, this was not a problem. You could just put the VMs into maintenance mode and update one host.
Therefore, you started the Install Update Wizard, selected the updates you would like to install and had the possibility to select the host you would like to update:
When the update was finished, you disabled the Maintenance mode on the corresponding VMs and enabled it on the VMs on the next host. After some time the VMs from the second host were not in use any longer and you could update the second host. Since XenCenter 7.2, this is not possible any longer. After selecting an Update, you can only select to update the whole Pool:
Luckily, there is a small “workaround” to use the XenCenter to download the updates and copy them to the XenServer. (I really like the Update Overview in XenCenter – no hassle to look online which updates are available.) To use this workaround you start the Install Update Wizard and select the Update you would like to install.
In the next step, select the pool containing the server(s) on which you would like to install the update. Now the update is downloaded and transferred to the pool. It is important that you now do not press Next! When you close this dialog (Cancel), the update will be deleted from the Pool.
Instead, you need to connect to the console (e.g. using Putty) of a XenServer that is a member of the Pool. Now we need to figure out the UUID of the update. Therefore, you need to enter the following command:
xe update-list name-label=HOTFIXNAME
You can find the Name of the Update in the XenCenter Download Window. For example, Hotfix 11 for XenServer 7.1 CU1 has the Name XS71ECU1011. Copy the UUID and note if something is required after the hotfix is installed (after-apply-guidance). Either this can be a Toolstack restart (restartXAPI) or a host reboot (restartHost).
The next step is to install the Update on the required hosts. This can be achieved with the following command:
xe update-apply host=HOSTNAME uuid=PATCH-UUID
Replace HOSTNAME with the name of the XenServer you would like to update and PATCH-UUID with the copied UUID from the Patch. Repeat the same for all Hosts you would like to update. When the patch was applied, no further message is displayed.
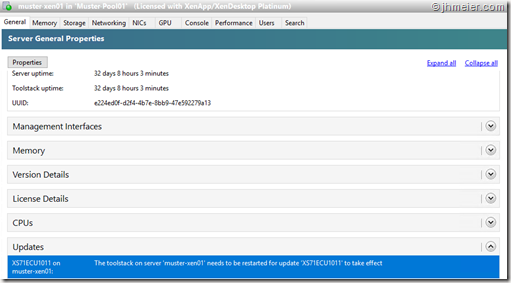
That means you have to remember the after-apply-guidance which was shown with the Update UUID. The good thing is – if you have forgotten that you can check in XenServer if another step is necessary. Just open the General area from the Server. Under Updates you can see if an installed Update requires a Toolstack or Host restart. If a Toolstack or Host restart is necessary, do them to finish installing the update.
That is it – now you know how to install an Update to a single server on a XenServer Pool member. There are just two other things I would like to add.
The first is that you can install multiple updates at the same time. Therefore, you start with the same steps. You select an Update in the XenCenter and continue until it was transferred to the Pool. Now you go back with “Previous” to the Select Update area. Select the next Update and continue like before until the Update was transferred to the XenServer Pool. Repeat this for all updates you would like to install. Remember tha you not close the Update dialog – otherwise the update files will be removed from the Pool and you cannot install them any longer. Now note down the UUID from the updates and install all of them. It is not necessary to reboot after each update (which requires a Reboot of the Host / Restart of the Toolstack). Just install all and if an update (or multiple) require a reboot, reboot once at the end.
The next thing I would like to add is that you can also keep the files on the XenServer. Therefore, you need to kill the XenCenter trough the Task Manager when the Updates have been transferred to the Pool.


