Creating a High Available IGEL Universal Management Server Infrastructure with Citrix NetScaler
When you reach a point where you manage many IGELThin Clients you might think that it’s quite helpful that the Igel UMS is still available even if the Server with the UMS fails. Furthermore, you can use this to reduce the load on one systems. For example when multiple Clients update their Firmware at the same time, they all download it from the IGELUM Server. To reach this goal you have two options:
1. Buy the IGEL High-Availability Option for UMS (including a Load Balancer)
2. Load Balance two UMS that use the same Database with a Citrix NetScaler
In this blog post, I would like to show you how to realize the second option. Before we can start with the actual configuration, we need to have a look at a few requirements for this configuration.
1. Database Availability
When you create a High Available UMS Server Infrastructure you should also make the required Database also High Available. Otherwise, all configured UMS Servers stop to work when the Database Server failed.
2. Client IP Forwarding
The UMS Servers need to know the actual IP of the Thin Clients. When you would not forward the Client IP all Thin Clients would have the same IP Address. You then won’t be able to send commands to a Thin Client or see their online status. Unfortunately, this leads to another problem. The client connects to the load balanced IP of the UMS Servers. This is forwarded (with the original Client IP) to one UMS Server. This server replies directly to the Thin Client IP. The Thin Client now receives a reply not from the IP Address it initially connected to and ignores the reply. One (easy) way to fix this issue is to put the UMS Servers in a separate Subnet. Add a Subnet IP (SNIP) to the NetScaler in this Subnet and configure this NetScaler SNIP as the Default Gateway for the UMS Servers. When doing this the UMS Servers receive the original Client IP but the reply to the Client still passes the NetScaler which can then replace the Server IP with the load balanced IP Address.
Now let’s start with the actual configuration. The first step is to install the Standard UMS (with UMS Console) on two (or more) Servers. 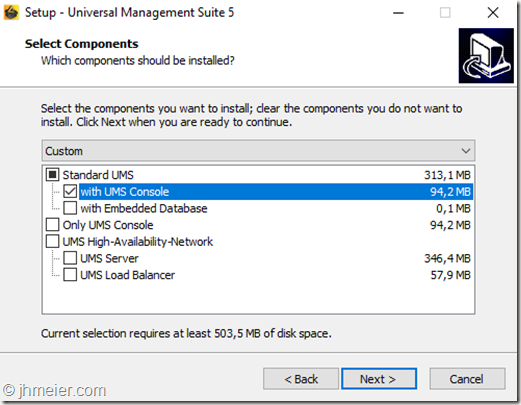
After the installation finished successfully, it’s time to connect the external Database (if you are unsure about some installation steps have a look at the really good Getting Started Guide). Therefore, open the IGEL Universal Management Suite Administrator and select Datasource. 
In this example, I will use a Microsoft SQL Always On Cluster – but you can select every type of available Database that offers a high availability option. Of course this is nothing that must be – but how does it help you, when the UMS Servers are high available and the database not? If the database server fails, the UMS would also be down – you still would have a single point of failure.
Enter the Host name, Port, User, Schema and Database Name. 
Keep in mind that the database is not automatically created – you have to do this manually before. For a Microsoft SQL Server you can use the following script to create the Database. After creating, the database don’t forget to make it highly available – e.g. using the Always-On function.
If you prefer a different name change rmdb to the required name. Beside that replace setyourpasswordhere with a Password. The user (Create User) and Schema (Create Schema) name can also be changed .
CREATE DATABASE rmdb
GO
USE rmdb
GO
CREATE LOGIN igelums with PASSWORD = ‘setyourpasswordhere’,
DEFAULT_DATABASE=rmdb
GO
CREATE USER igelums with DEFAULT_SCHEMA = igelums
GO
CREATE SCHEMA igelums AUTHORIZATION igelums GRANT CONTROL to igelums
GO
After confirming the connection details, you now see the connection. To enable the connection select Activate and enter the Password of the SQL User. 
On the first server, you will get the information that there is no schema in the Database that needs to be created. Confirm this with Yes. 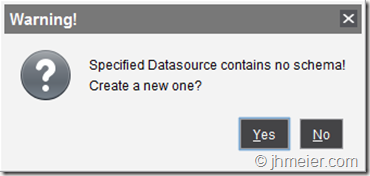
You now should see an activated Datasource Configuration. Repeat the same steps on the second UMS Server. Of course, you don’t need to create another Database – just connect to the same Database like with the first server.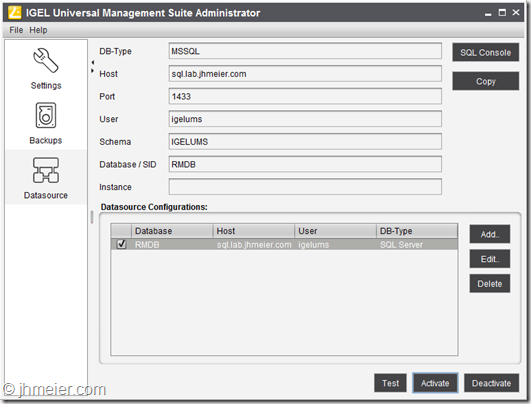
Time to start with the actual Load Balancing configuration on the Citrix NetScaler. Open the Management Website and switch to Configuration => Traffic Management => Servers 
Select Add to create the IGEL UM-Servers. Enter the Name and either the IP Address or Domain Name 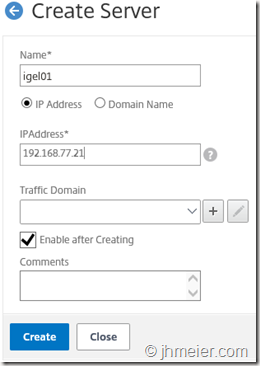
Repeat this for all UM-Servers (in my example I added two servers). 
Now we need Services or a Service Group containing / for all UMS Servers. I personally prefer the Service Groups but if you normally use Services this is also possible. 
After switching to Service Groups select again Add to create the first UMS Service Group. In total, we need three Service Groups.
Port 30001: Thin Client Connection Port
Port 8443: Console Connection Port
Port 9080: Firmware Updates
The first one we create is the Service Group for Port 30001. Enter a Name and select TCP as the Protocol. The other settings don’t need to be changed. 
Now we need to add the Service Group Members. Select therefore No Service Group Member. 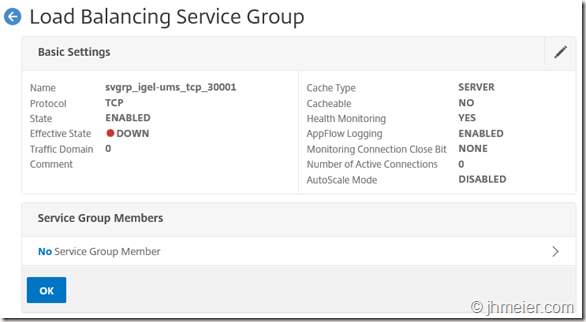
Mark the UMS Servers created in the Servers area and confirm the selection with Select. 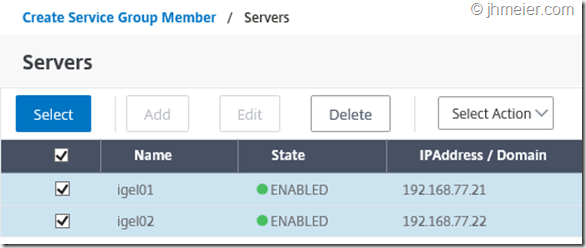
Again, enter the Port number 30001 and finish with Create. 
The Service Group now contains two Service Group Members. 
As mentioned at the beginning we need to forward the Client IP to the UMS Servers. Otherwise, every client would have the same IP – the NetScaler Subnet IP. Therefore, edit the Settings (not Basic Settings!) and enable Use Client IP. Confirm the configuration with OK. 
That’s it – the Service Group for Port 30001 is now configured. 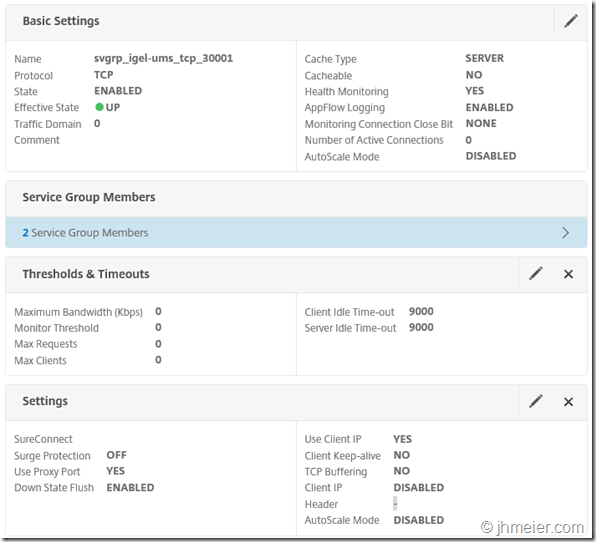
Repeat the same steps for Port 8443 – but do not enable Use Client IP. Otherwise, you will not be able to connect to the UMS Servers with the load balanced IP / Name inside the IP Range of the UMS Servers itself. 
Finally, you need to create a Service Group for Port 9080 – this time you can again forward the Client IP. 
At the end, you should have three Service Groups. 
Time to create the actual client connection points – the Virtual Servers (Traffic Management => Load Balancing => Virtual Servers).
Like before select Add to create a new Virtual Server. Again, we need three virtual servers for the Ports 30001, 8443 and 9080.
The first Virtual Server we create is for Port 30001. Enter a Name and choose TCP as the Protocol. Furthermore, enter a free IP Address in the separate Subnet of the UM-Servers. The Port is of course 30001. 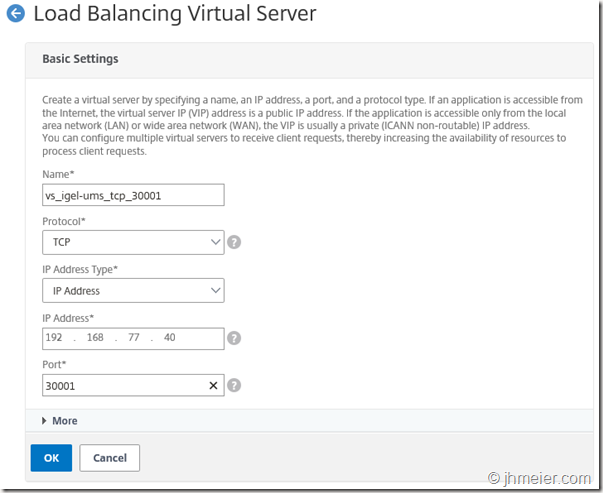
After this, we need to bind the Services or Service Group to this Virtual Server. If you created Services and not a Service Group make sure, you add the Services of all UMS Servers. To add a created Service Group click on No Load Balancing Virtual Server Service Group Binding. 
Select the Service Group for Port 30001 and confirm the selection with Bind. 
The Service Group is now bound to the Virtual Server. Press Continue to get to the next step. 
When a client connects, we need to make sure it always connects to the same UMS Server after the initial connection and not flips between them. When a client stopped the connection or a UMS Server failed, it’s of course OK if the client connects to the other UMS Server. Herefore, we need to configure a Persistence. As Persistence Type, we select Source IP and the Time-Out should be changed to 5. IPv4 Netmask is 255.255.255.255. Confirm the Persistence with OK. 
Finish the Virtual Server configuration with Done. 
Repeat the same steps for the other two ports – thus you have three Virtual Servers at the end. Of course, all need to use the same IP Address. 
To make it more easy to connect to the Load Balanced UMS Servers it is a good idea to create a DNS-Host-Entry e.g. with the name Igel and the IP address from the Virtual Servers. When you added a DHCP Option or DNS Name for the Thin Client Auto registration / connection change them also to the IP address of the Virtual Servers. 
You can now start the IGEL Universal Management Suite and connect to the created Host-Name. 
After a successful connection, you can see the used server name in the bottom left area and under the Toolbar. 
We now need to point the Thin Clients to the new Load Balanced UMS Servers. You need either to modify an existing policy or create a new one. The necessary configuration can be found in the following area:
System => Remote Management => Universal Management Suite (right area).
Modify the existing entry and change it to the created Host name. Save the profile and assign the configuration to your Thin Clients 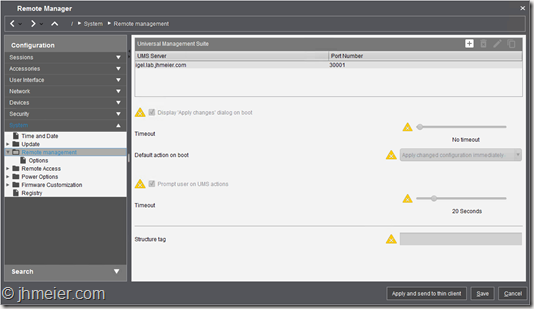
The last step is necessary to allow the Thin Clients to update / download a firmware even when one UMS Server is not available. By default, a Firmware always points to one UMS Server and not the Load Balanced Host name. Therefore, switch to the Firmware area and select one Firmware. Here you can find the Host. Change this to the created Host name and save the settings. Repeat this for all required Firmware’s. If you download a new Firmware make sure you always modify the Host – otherwise a new Firmware will only be available from one UMS Server. 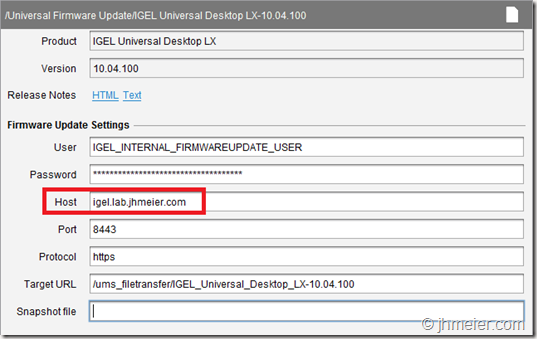
Of course, when you download or import a Firmware using the UMS this is only stored on one of the UMS Servers. To make the Firmware available on both UMS Servers you need to replicate the following folder (if you modified the UMS installation path this would be different):
C:\Program Files (x86)\IGEL\RemoteManager\rmguiserver\webapps\ums_filetransfer
A good way to do this is using DFS. Nevertheless, every replication technology is fine – just make sure (when changing the Host entry for a Firmware) that the Firmware’s are available on both UMS Servers.
That’s it – hope this was helpful for some of you.


